| NAVAL ORDNANCE AND GUNNERY VOLUME 2, FIRE CONTROL CHAPTER 21 BATTERY ALIGNMENT |
| HOME INDEX Chapter 21 Battery alignment A. Alignment of gun sights B. Train alignment in drydock C. Elevation alignment in drydock D. Battery alignment afloat E. Firing stop mechanisms |
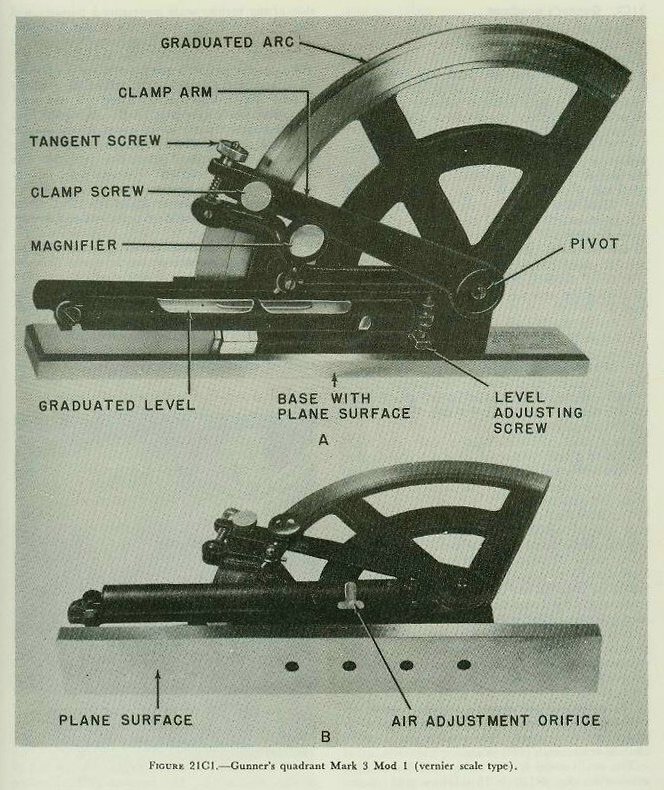
| C. Elevation Alignment in Drydock 21C1. Purpose of alignment in elevation A battery is aligned in elevation after it has been aligned in train. The purpose of alignment in elevation is to adjust the battery so that at any angle of train and elevation the lines of sight of directors and guns and the bore axes will all be elevated at exactly the same angle above a common reference plane, provided that no vertical parallax is introduced, no ballistics are considered, and the dials are matched. Before undertaking elevation alignment, each element involved should be properly adjusted, and a transmission check should be completed satisfactorily. There is an appreciable change in the shape of a vessel between drydocked and afloat conditions.(1) While the taking of elevation alignment data when the ship is in drydock is described here, these data cannot be used to effect a final operating alignment afloat, because of the change in the shape of the ship and the consequent shifting of the relative positions of the various elements of the battery. Therefore the battery must be realigned when the ship is waterborne. (1) Battery alignment is usually done with just enough water pumped out of the dry dock so that the hull rests firmly on the blocks; this condition is known as partia11y waterborne. 21C2. Gunner’s quadrant To obtain data for elevation alignment, use must be made of a gunner’s quadrant. The gunner’s quadrant is an instrument which measures the angle between its own base plate and the horizontal. The correct use and reading of a gunner’s quadrant are rather difficult; accurate results can be obtained only after considerable practice. The following suggestions will prove helpful: 1. When using the quadrant, see that it rests firmly on a smooth surface, but do not clamp it to the surface so tightly that the quadrant becomes distorted. 2. Make sure the arc of the quadrant is properly positioned; c. g., if the elevation of a gun at a given bearing is to be measured, place the quadrant so that its arc is parallel to or coincides with the vertical plane through the axis of the bore. 3. Bring the bubble approximately to the center by sliding the arm along the arc; then clamp the arm. 4. Center the bubble carefully by means of the fine adjustment screw, allowing sufficient time for it to come to rest. 5. In any series of observations have one man use the quadrant for the entire set of readings. Two types of gunner’s quadrants are in use at the present time: the vernier type (Mark 3 Mod 1) and the drum type (Mark 7). |
 |
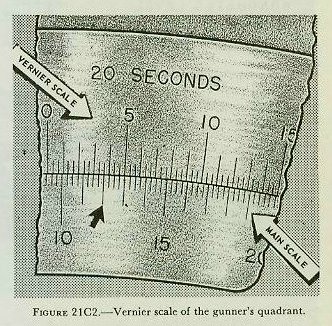 |
| The gunner’s quadrant Mark 3 Mod 1 (fig. 21C1) consists of a base, the bottom of which is ground to an accurate plane surface, an arc mounted perpendicularly on the base, an arm containing a spirit level, and a clamp arm. The level arm and clamp arm are pivoted to the arc. The clamp arm serves to secure the level at any particular position on the arc by means of the clamp screw. The clamp arm is connected to the level arm by a tangent screw for making fine adjustments between the clamp and the level. The level in the level arm is a slightly curved graduated glass tube filled with colored alcohol and containing an air bubble. The upper surface of the glass tube is graduated so that the bubble can be accurately centered. The level arm also carries the vernier scale, which slides along the arc, and a magnifier glass. The glass vial containing the spirit level is enclosed in a metal tube with only five inches of its upper surface exposed. The glass is graduated in units of ten seconds (10”) of arc. The main scale is 100° long, and its smallest graduation (fig. 21C2) is 15 minutes (15’) of arc. (In some mods, the degrees are divided into six parts of 10 minutes of arc each.) Each main division of the vernier scale represents 5 minutes, and the next smaller graduations represent minutes. The smallest graduations represent 20 seconds of arc each. To use the gunner’s quadrant, place it carefully on a flat surface parallel to the axis of the gun bore or other object to be measured, and with the quadrant pivot toward the gun muzzle. Bring the level bubble approximately to the center of the bubble tube by adjusting the clamp arm and level arm positions on the arc. Tighten the clamp screw to hold the arms in position. Then turn the tangent screw slowly in the proper direction to bring the bubble exactly into the center of the tube. Then read the measured angle from the arc and vernier scales. In reading the scale, count along graduations on the arc scale to the zero on the vernier. This will give a ROUGH reading in degrees and minutes. To get the fine reading, count from the zero on the vernier scale up to the division on the vernier scale that lines up exactly with a division on the arc scale. This will give the fine reading. Add the course and fine readings together to get the total angle of inclination. In figure 21C2, the indicated value is 9° 18’ 40”. This is read as follows: 1. The zero on the vernier falls between 9 and 10 on the main scale. The smallest graduations on the main scale are 1/4° or 15’ apart. Since the zero graduation on the vernier falls between the first and second small graduations above the 9° graduation (which is not visible in the detail view of figure 21C2), the coarse reading must be 9°15’. |
 |
 |
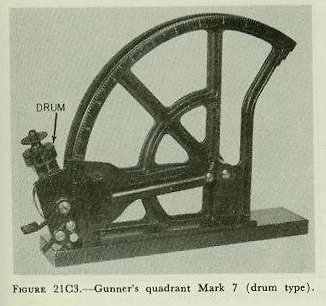
| 2. Now locate the graduation on the vernier which lines up with a graduation on the main scale. (This is pointed out in the figure by the small black arrow.) Since, as the engraving on the vernier scale shows, the smallest graduations on the scale represent values 20” apart, all that remains is to count on the vernier scale the graduations from zero to the matching one, and add this fine value to the coarse reacting. This fine value is 3’ 40”. Adding this to 9° 15’ yields 9° 18’ 40”. Often the difference between consecutive readings of a gunner’s quadrant will be so small that it is not necessary to center the bubble for each reading. Instead, the second reading can be read directly in terms of the displacement of the bubble from its center position. The Mark 7 gunner’s quadrant (fig. 21C3) has been designed for easy reading. The vernier scale has been replaced by a micrometer drum mounted on the shaft of the tangent screw. For coarse adjustments, the level arm can be moved to any position by disengaging the tangent screw from the teeth cut on the arc. The main scale is graduated as shown in figure 21C3. One revolution of the drum displaces the level arm by one degree. The finest graduation on the drum is 30 seconds, and each 5-minute graduation is numbered. Each graduation on the spirit level glass also represents 30 seconds of arc. While the drum type quadrant is much easier to read, it may be inaccurate unless certain precautions are taken. I. Lost motion often exists between the worm and worm-wheel assembly that drives the level arm. Since the fine reading is read from the drum, any lost motion of the tangent screw introduces an error-often as much as 20 seconds. However, the lost motion can be eliminated if the tangent screw is always turned in the same direction when centering the bubble. 2. A second possibility for error results from inaccuracies in the teeth cut on the arc. For this reason all drum-type quadrants are calibrated and a correction sheet is issued with each quadrant. Whenever the quadrant is read, the corresponding correction factor should be applied. 3. Care must be taken in disengaging and reengaging the tangent screw. The spring holding the tangent screw against the arc is strong, and the teeth can be damaged if the tangent screw is allowed to snap into mesh. Before the gunner’s quadrant (either type) is used, it must be zeroed, as follows: 1. Adjust the bubble to correct length, if necessary. 2. Select a smooth plane surface that is approximately level. Place the quadrant on this surface, and draw thereon a line around the base of the quadrant. Center the bubble and read the quadrant. 3. Turn the quadrant around so that the inclination is measured in the opposite direction. Be sure that the base of the quadrant lies within the outline. Center the bubble and read the quadrant again. 4. The average of these two readings should be zero. If it is not, the quadrant must be adjusted (by the adjustment screw on the level tube) until additional tests show that the average of the two readings is zero. 21C3. Roller-path data with gunner’s quadrant A very important phase of elevation alignment is the procurement and interpretation of roller-path data. The purpose of taking roller-path data is to determine the actual relationship between the roller path and the horizontal plane. Then the necessary compensations can be made for aligning all elements of the battery to a common reference. These data consist of a series of readings showing the relative inclinations of the planes of each roller path to some fixed plane. At sea this fixed plane is the reference plane of the battery, as explained in article 2lC5, but in drydock it usually is a horizontal plane established by a spirit level. The data are used to determine the relationship in space of the various roller paths. |
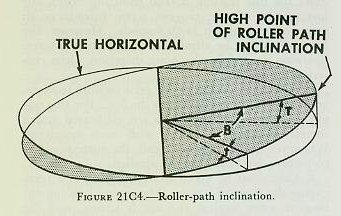
| In all modern installations, it is assumed that the roller paths of all elements are true planes or so close to true planes that distortion is unimportant and not measurable. The relationship between a tilted plane and the true horizontal plane is shown in figure 2lC4. It can be proved that the tilt (t) of the roller path at any point is equal to the maximum value of the tilt (T) between the planes (i. e., the tilt at the high point of the roller path) times the cosine of the train angle (B) between the high point and the point under consideration. Therefore the readings obtained at points through the training limits of the element should vary in a sinusoidal manner, with some readings above and some below the horizontal. If they do not vary in this way, it is evident that the roller path has become distorted. |
| Procedure for obtaining drydock roller-path data with a gunner’s quadrant is as follows: 1. Secure the quadrant to some smooth surface on the gun or director in such manner that the line of the quadrant is parallel to the axis of the gun bore (or the director’s line of sight) and the pivot of the arm is forward (toward the muzzle). 2. Set the roller-path tilt corrector (if there is one) to zero tilt. 3. Elevate the gun to some convenient angle; this will make all readings positive. The difference between the readings is all that is important, so the amount of elevation is immaterial. In the case of a director, the forward end of the quadrant must be shimmed up to obtain the same results. 4. Train the gun or the director to 0°, level the bubble, and read the quadrant. Repeat this process for every 10° or 15° of train. Record the inclination and the angle of train in each case. |
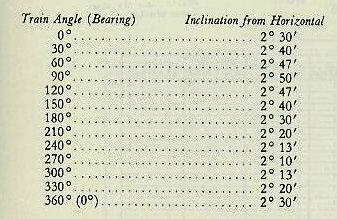 |
| 21C4. Interpretation of roller-path data The relationship between any roller path and the horizontal is defined by the amount of tilt at the highest point of the path and the bearing of this point, and compensating devices are built to correct in these terms. Therefore in order to interpret the results of these two quantities must be determined for each roller path. There are two commonly used graphic methods available for this determination: the sine-curve method and the 60° radial method. In order to explain these methods more clearly we shall assume a set of typical roller path data shown below, and actually find the high point and its bearing by these methods. Although the following table shows inclination at 30° intervals of train, in actual practice, readings would be taken every 10° or 15°. Note that all readings are positive. This is due to the fact that the quadrant was slightly elevated, mentioned before, to avoid the complication negative numbers. |
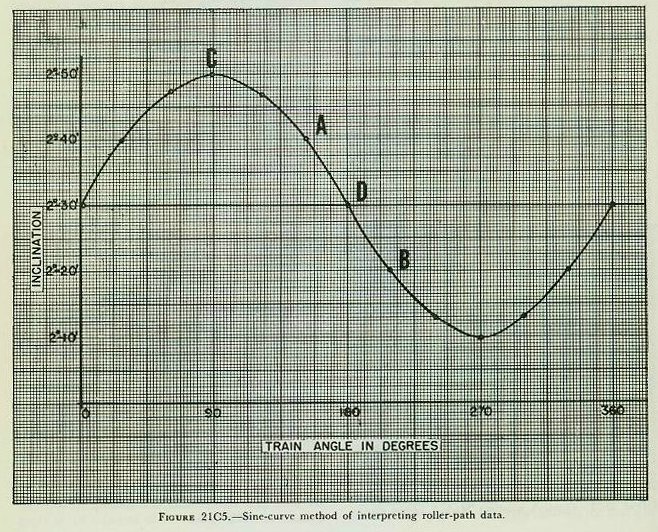 |
| Sine-curve method. As stated before, the inclinations from the horizontal will vary in a sinusoidal manner. Therefore, if the inclinations arc plotted against the bearings, a sine curve will result. The curve for the sample data readings is shown in figure 21C5. The bearings are read along the horizontal axis, and the inclinations are plotted vertically at these bearings. Then the sine curve is drawn by fairing-in a line through these points. The actual fairing-in of this curve is rather difficult, and for this reason the sine method is rarely used for drydock data. After the curve is drawn, its zero axis is drawn in, parallel to the horizontal axis of the graph. It should pass through the curve halfway from the low to the high point, and its distance from the axis should equal the arbitrary elevation which was introduced to obtain positive readings. To determine the inclination and bearing of the high point of the roller path it is only necessary to read the bearing and inclination of the high point of the curve. This is shown clearly on the figure. In this case the path has an inclination of 20 minutes at a bearing of 90 degrees. Note particularly that the inclination is the inclination from the axis of the curve itself, not from the axis of the graph. Sixty-degree radial method. The second and most widely-used method of plotting the roller path data is the 60° radial method. There are several advantages to this method. Fairing a sine curve in rectangular coordinates from roller-path data obtained as described in article 21C5 is a difficult process. Also, in many cases the arc through which the element can train is limited, so that only part of the sine curve will be obtained. In all cases of limited train the radial method, which is based on the fact that a sine curve plots as a circle in polar coordinates, is preferable; and in extreme cases it is the only possible method to use. An examination of the sine curve in figure 21C5 will show the principle on which the 60° radial method is based. First notice the point D at which the curve crosses the zero axis. If the inclination is read at a point 30° to the left of point D (point A on the curve) the inclination can be seen to equal one-half of the inclination of the high point C. (This can be proved by trigonometry, since the sine of 30° is .5.) The value of inclination at point B, 30° to the right of point D, is also equal to one-to half of the inclination of the high point C; in other as words the vertical distance between A and B is equal to the total inclination at the high point C, which is the maximum inclination of the curve. If any other two points, 60° apart, are taken, the difference between their inclinations will always be less than the maximum. Thus, if a series of readings 60° apart are subtracted from each other and differences plotted, using the median bearing, a new sine curve having the same amplitude will result, with the high point 90° from that of the original curve. To simplify the mathematics involved, instead of using the median bearing, we plot the values against the lower bearing of each pair. Now our new curve will be out of phase by only 60°, and the bearing of the high point will be obtained by subtracting 60° from that of our new curve. |
 |
 |
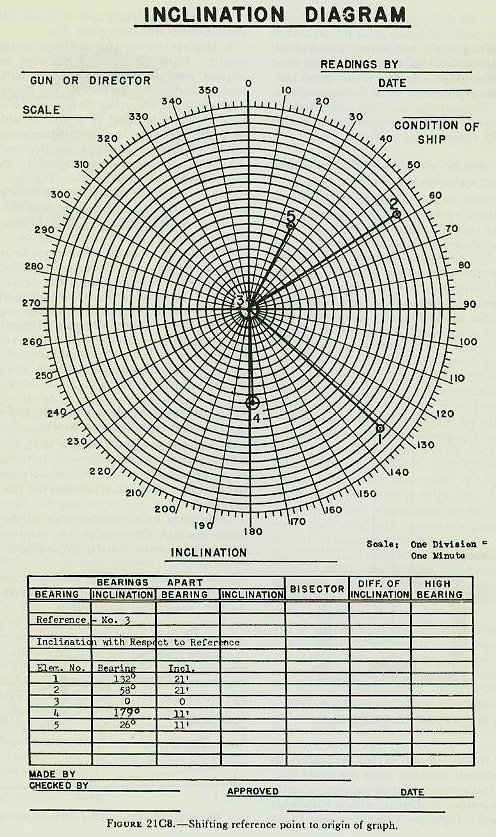 |
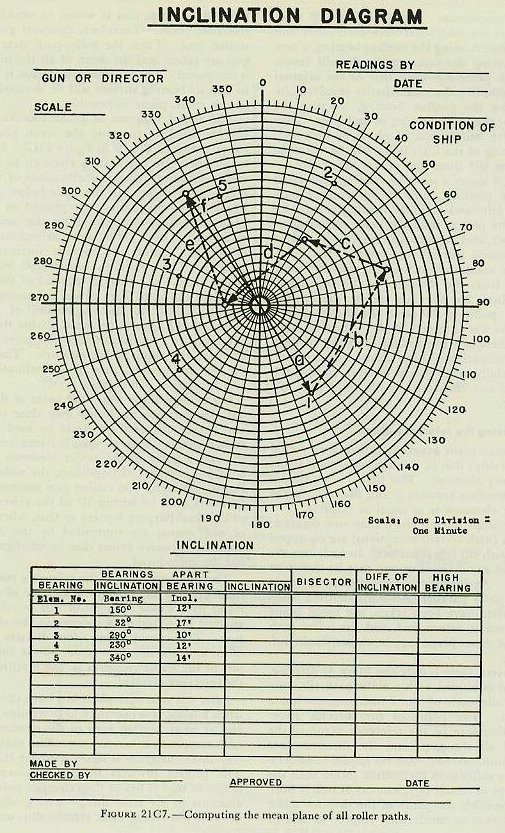
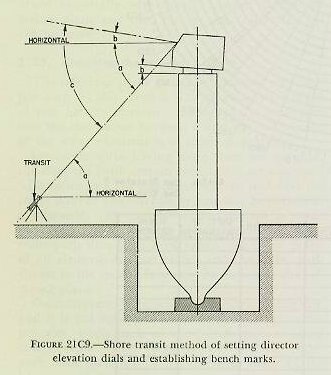
| Figure 21C6 shows a series of readings 60° apart arranged for plotting, with the differences indicated. The left-hand or lower bearing is used for plotting. The plot as shown is made on polar coordinate paper, and our new sine curve will appear as a circle passing through the origin. The diameter gives the maximum inclination, and 60° counterclockwise from the diameter is the bearing of the high point. For the data shown, the bearing of the high point is 90° and the inclination is 20 minutes, as was obtained above in the sine-curve method. These are the settings-bearing of high point and inclination of high point-that are combined vectorially with the inclination of the reference plane and then put on the roller-path tilt compensator. 21C5. Choosing the reference plane The reference plane generally chosen is an actual plane on the ship; that is, it is the roller-path plane of one battery element. The plane is so chosen that the inclination between it and the roller paths of the other elements is as small as possible. On larger ships having more than one director, the directors (with certain exceptions) are equipped with roller-path tilt compensators. In such case the roller path of any director or gun may be chosen as a reference. At installation an attempt is made to make all paths parallel. After installation, when roller-path data have been taken, the mean plane of all elements is determined, and the roller path closest to the mean plane may be chosen as the reference plane. On destroyers, there is only one Mark 37 director, and it is not equipped with a roller-path tilt compensator, while each of the 5-inch mounts has a compensator. The plane of the director roller path must therefore be the reference plane of the battery. If all the guns and the director were installed simultaneously, with no special consideration given to roller-path inclination (other than the usual attempt to install the elements as nearly horizontal as possible), the plane of the director roller path might vary so much with respect to one or more of the guns that it would be unsuitable as a reference plane. Therefore, destroyer guns are installed first. Then the roller-path data for each gun are taken, and the mean of all the inclinations is computed. The director foundation is machined so that its bearing surface will be as nearly parallel to this mean plane as possible. The radial diagram or polar coordinate graph may be used to compute the mean plane of all roller paths, as shown in figure 2lC7. In this example there are five battery elements to be considered. The bearings and inclinations of their high points are indicated in the table below the graph. Bearings and inclinations are plotted on the radial diagram, being represented by the small circles numbered 1 to 5. The sum, as indicated, is obtained by adding the various inclinations vectorially. The resultant, represented by the line drawn from the center to the end of the last line (e) gives the solid line (f) on a bearing approximately 326° with an inclination of about 16 minutes. To obtain the mean, divide the total inclination (16’) by the number of elements (5). In this case the result is 3.2 minutes. The mean of the five inclinations, then, is an inclination of 3.2’ at a bearing of 326 degrees. On modern ships, the roller paths of the individual elements are machined very close to parallel, and almost any of them could be used as the reference plane. Present specifications require that the roller paths of the major elements be within 6’ of one another. In addition, the roller paths of the 40-mm and 3”/50 caliber gun mounts and their directors must be within 10’ of the reference plane of the dual-purpose battery so that, when the guns of one system are controlled by the director of another, excessive errors due to misalignment will not be introduced. The final selection of the reference roller path is influenced by the obvious advantage of choosing a roller path whose inclination will be relatively unaffected by waterborne changes in the ship’s structure. This consideration often dictates the choice of an element near the center of the ship, such as one of the stable elements in the plotting room, as the reference element. After the reference plane has been chosen and its tilt is known, it is necessary to determine how much and at what bearing each of the elements is tilted with respect to this reference. The radial or polar coordinate diagram is again used for this purpose. The process involves shifting the origin of the graph so that it lies at the reference point, or what amounts to the same thing-moving all the points without disturbing their relationship until the reference point lies on the origin of the graph. Figure 21C8 shows the points of figure 21C7 transferred so that element No. 3 is the reference. The inclination of any element to this reference can be read directly from the graph. It should be noted that the inclinations represented in this diagram have been assumed for purposes of illustration; lack of parallelism to such a degree is rarely encountered in modern ship construction. 21C6. Setting director elevation dials and establishing elevation bench marks The bench mark is established to be used as a reference in checking director sights and dials at sea. The shore transit method is as follows: 1. Train the director to either the high or the low point on the roller path. This is done so that the true tilt of the director may be obtained easily from the roller-path data. 2. Vertical parallax correctors must not be operating or parallax range must be set for infinity. The roller-path compensator should be set at zero inclination. 3. Level the transit (ashore) so that the level bubble under its scope is centered when the stadia (elevation) circle reads zero. Illuminate the pointer’s telescope from inside the director with a flashlight, and sight into this telescope with the transit. 4. Read angle a, as shown in figure 2lC9. Read angle b from the roller-path data. 5. Depress the director telescope to sight on the transit. With the director telescope and transit aligned, read the director elevation dials. To this reading add angle c. Elevate the director line of sight until the elevation dials read the sum of the two. Angle c is equal to a plus b, which are respectively the angle below the horizontal through which the director telescope was depressed to sight on the transit, and the angle made by the director roller path with the horizontal plane. The director line of sight, therefore, will have been made parallel to the roller path, which is the condition desired. Set the elevation dials to zero with the director line of sight in this position. 6. Train the director and elevate or depress the pointer’s telescope as necessary to put the crosshairs on the bench mark. Record the bench mark depression. Remember that the bench-mark readings were taken with roller-path compensator set to zero, and for future accurate checks it must be so set. To provide for quick checks with the compensator functioning, it is well to establish and record an additional bench-mark reading with the roller-path compensator set as for firing. |
 |
 |
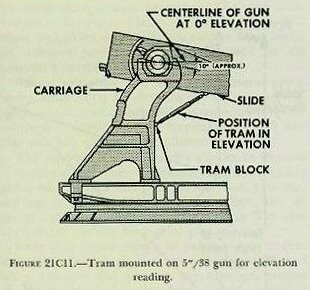 |
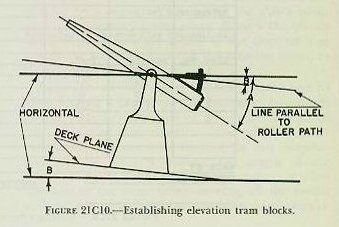
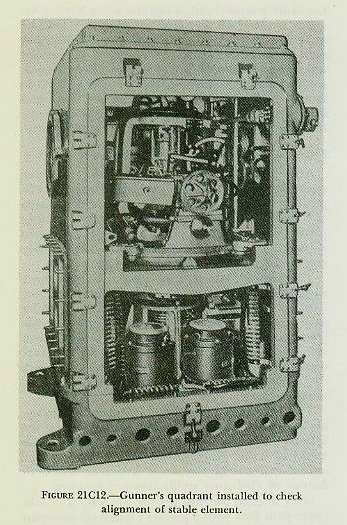
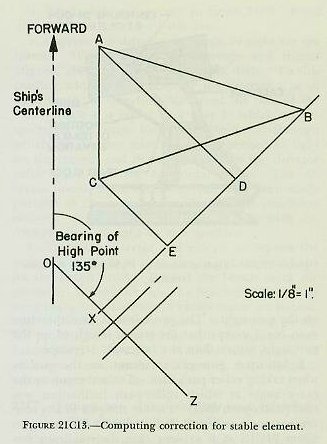
| 21C7. Setting gun elevation dials and establishing elevation tram marks To ensure that gun elevation dials will read the true elevation above their own roller paths, it is necessary to set the dials to proper position while in drydock. This may be done in the following four ways: 1. Install a boresight telescope in the gun, and follow through the same process that was used for setting the director’s dials, employing a transit set up ashore. 2. Make sure that the gun is properly boresighted, and set sight angle and deflection at zero on the gun sight. The procedure is then the same as in No. 1 except that the transit is sighted on the gun sight rather than the boresight telescope. 3. Set up a gunner’s quadrant on the gun as when taking roller-path data. Train the gun to the exact angle at which roller-path inclination was read (roller-path data). Elevate the gun to any convenient angle and read the quadrant. Referring to figure 2lCl0, it is evident that the quadrant has read the angle A between the gun bore and the true horizontal. However, the roller path is inclined to the horizontal by the angle B. Hence, the true angle of gun elevation is A-B, it the roller-path inclination is positive (as in fig. 21C10) and A +B, if the roller-path inclination is negative. Set the dials so that they read this value of A plus or minus B, as appropriate. 4. Set up a gunner’s quadrant as in No. 3. Train the gun 90° away from the high point of the roller path; thus eliminating roller-path inclination. Elevate the gun, read the quadrant, and set the dials in accordance with the quadrant reading. After the dials have been set, the train blocks are installed. The method used for installing train tram blocks described in article 21B5 is used for elevation tram blocks, except in the latter case one block is on the carriage and one is on the slide, as shown in figure 21C11. With the tram in position and its index marks lined up, the elevation-dial reading is recorded for use as a future check for proper elevation reading. 21C8. Dial accuracy check A dial accuracy check in elevation is made for the same purpose and using the same basic principles as the train dial accuracy check. It will be more convenient to use a gunner’s quadrant, however, to measure actual movement of the mount for comparison with the dial indication thereof. In the case of a director, the quadrant must be mounted on some surface, such as may be found on the rangefinder, that moves exactly with the line of sight in elevation. 21C9. Alignment of the stable element After the reference plane of the battery has been established, it is necessary to align the stable element or stable vertical so that the plane of rotation of its sensitive element is parallel to the reference plane. Of course, if the plane of one stable element is used as a reference plane, it will still be necessary to align any additional stable elements. The sensitive element is trained in accordance with director train and not in accordance with relative bearing in the horizontal plane. Its roller path, therefore, must be parallel to the reference plane, so that director train will produce the correct train of the stable element gimbals. Since these instruments are not equipped with roller-path tilt compensators, they must be aligned by shimming. Two methods are available for aligning the stable element with the reference plane. Since the first of these two is invariably used with all late marks of stable elements and stable verticals, the second will not be discussed; it can be found in Bureau of Ordnance publications if required. With modern instruments the first step is to take roller path data with a gunner’s quadrant mounted on the crosslevel gimbal-mounting bracket. (See fig. 21C12.) These data are plotted in the same manner as for other battery elements, and the bearing and inclination of the high Point of the stable-element roller path with respect to the reference plane are obtained. The number, thickness, and location of the shims needed to effect alignment is determined as follows: 1. On a plain sheet of paper draw a vertical line representing the ship’s centerline (see fig. 2lCl3). Draw a triangle, ABC, representing the three mounting legs of the stable element drawn to scale and in their correct relationship to the centerline of the ship. In the example, the scale is 1/8 inch equals 1 inch, and the legs are drawn so that the single leg is to starboard. 2. From any point O in the line representing the ship’s centerline, draw a line OZ at the bearing of the high point (with respect to the reference plane) of the stable element’s roller path. In the example, it is assumed that the high point is on bearing 135° and that its inclination is 15 minutes. 3. Drop a perpendicular BX, from the vertex of the triangle in the direction of the stable element’s high point, to the line OZ. 4. Drop perpendiculars, AD and CE, from the other two vertices of the triangle to line BX. 5. Measure the lengths of AD and CE and convert, according to scale, to the lengths represented. In the example, the length represented by AD is 25˝ inches, and that represented by CE is 12 1/2 inches. 6. Enter these lengths in the formula S=0.0003 LT, in which S is the amount of shimming needed under the leg, L is the length represented by the line dropped from that leg in the diagram, and T is the tilt of the roller path at its high point in minutes. In the example, leg A will require shims of 0.115 inch; and leg C, of 0.056 inch. Note that, in any case, only two legs will require shims. After shims of the proper thickness have been placed, the taking of roller-path data should be repeated. If the new readings show a variation from the reference plane of as much as 2 minutes at the high point, the calculation and shimming should be repeated. (Extreme care should be exercised after the shims are inserted. The holding-down bolts are tightened evenly with a torque wrench to prevent canting the stable element.) |
 |
 |